

Introduction
This tutorial will provide the steps to set up your SSL certificate to ESET Remote Administrator Virtual Appliance. In this example, the procedures are applied to ERA version 6.5 using a Windows 10 computer as a workstation.
Requirements
Before we start, the following items are required:
- SSL private key
- Primary certificate (your_domain_name.crt)
- Intermediate certificate (CA_Bundle.crt)
Procedures
1. Open a text editor (such as Notepad++) and paste the entire body of each certificate into one text file in the following order:
The Primary Certificate - your_domain_name.crt
The Intermediate Certificate - CA_Bundle.crt
Make sure to include the beginning and end tags on each certificate. The result should look like this:
-----BEGIN CERTIFICATE-----
(Your Primary SSL certificate: your_domain_name.crt)
-----END CERTIFICATE-----
-----BEGIN CERTIFICATE-----
(Your Intermediate certificate: CA_Bundle.crt)
-----END CERTIFICATE-----
2. Save the combined file as customCert.crt. The .crt file is now ready to use.
3. Download and install the latest version of PuTTY
4. Using PuTTY, establish an SSH connection to the ERA VA using your credentials (Username: root)
5. For security, make a backup of server.xml and keystore files located in /etc/tomcat. Use the command cp server.xml server.xml.bak and cp .keystore .keystore.bak.

6. Type the command nano server.xml to edit the file. Scroll down until reaching the keystorePass field and enter your strong password. Take note of the chosen password as it will be needed.
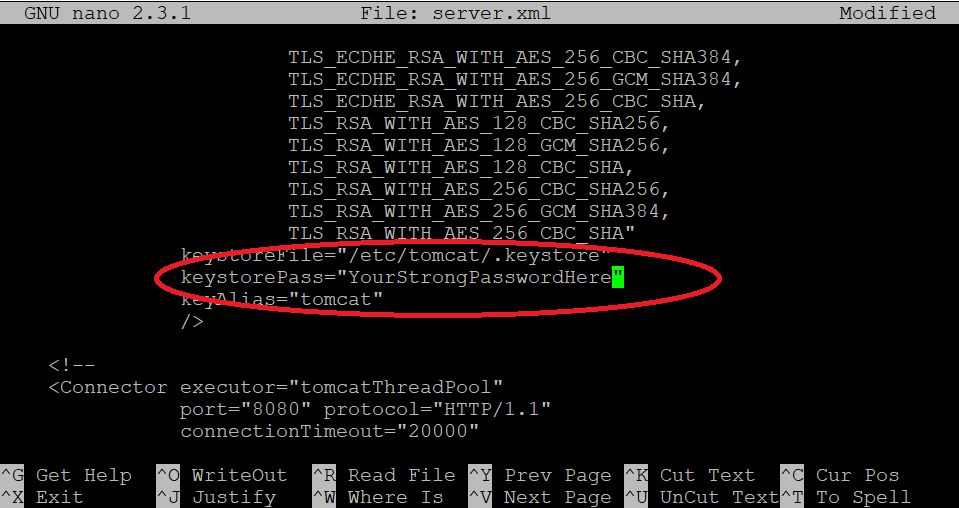
7. Save the file and exit with Ctrl+O and Ctrl+X.
8. Download and Install the latest version of KeyStore Explorer.
9. Create a new JKS KeyStore

10. Import a Key Pair in OpenSSL format

11. Browse the private key and the customCert.crt created in step 2

12. Enter tomcat as alias

13. Enter your strong password for the Key Pair defined in step 6

14. When saving the file, a prompt for the KeyStore password will be displayed. You need to enter the same password as defined in step 6

15. Now we need to copy the keystore file into the ERA appliance via SSH and name it .keystore. To do so, open the command prompt and type the following command:
pscp c:\<folder>\keystore.jks root@<ipaddress>:/etc/tomcat/.keystore
Here is an example:

16. Reboot your ERA VA. You can shutdown the appliance via SSH using the command shutdown -P now. Then you will manually need to turn back on.
17. At this stage your ERA server should be able to see the SSL certificate successfully installed in your browser.

Note: If you get an error “Login failed: Connection has failed with state 'Not connected'” after rebooting the server, via SSH try to stop the ERA service and start again with the command service eraserver stop and service eraserver start
